
Truth is, I've never been much of a Halloween person. Sure, as a kid, I loved the candy -- but Haunted Houses, scary movies and the whole dressing up and traipsing around the neighborhood in the freezing cold (and my recollection was that it was ALWAYS cold on Halloween in NJ!) -- just never really did it for me.
Halloween became a little more fun when I had kids of my own, but I was still never one of those moms who crushed it with costumes; and in the 25 years we lived in our house, we never had a single trick or treater. Needless to say, Halloween was always a bit of a bust for me.
I do, however, love fall -- the colors, the flavors and the decorations -- and whatever the holiday I always appreciate themed foods!
These little jack-o'-lantern "pumpkins" filled with a healthy, fiesta-inspired blend of spices, ground turkey and black beans are too cute not to share!
Enjoy!
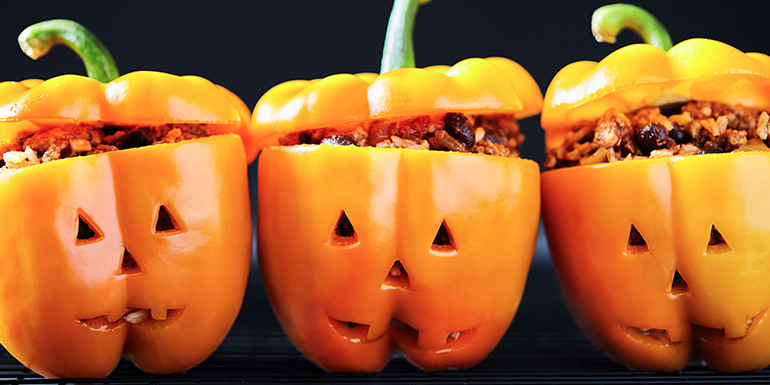
Jack-o’-Lantern Stuffed Peppers
These festive Stuffed Peppers are perfect for Halloween!Course: Main CoursePrep Time: 25mCook Time: 35mTotal Time: 60mServings: 4 servings, 1 bell pepper eachIngredients:– 4 medium orange bell peppers– 2 tsp. olive oil– 1 lb. raw 93% lean ground turkey– ½ medium onion chopped– 1 clove garlic finely chopped– 1 Tbsp. chili powder– ½ tsp. ground cumin– Ground black pepper to taste; optional– 1 (8-oz.) can tomato sauce, no sugar added– 1 cup black beans drained, rinsed– 1 cup cooked brown rice– ¼ cup water– ½ cup shredded sharp cheddar cheeseInstructions:1) Slice stem end off peppers. (Reserve for later use.) Remove seeds and veins from peppers. Cut a jack-o-lantern face out of one side of each pepper. Stand peppers upright in baking dish. Set aside.2) Preheat oven to 400º F.3) Heat oil in large nonstick skillet over medium-high heat.4) Add turkey; cook, stirring frequently, for 4 to 5 minutes, or until almost browned.5) Add onion; cook, stirring frequently, for 4 to 5 minutes, or until onion is translucent.6) Add garlic; cook, stirring frequently, for 1 minute.7) Add chili powder, cumin, pepper (if desired), tomato sauce, and beans; cook, stirring occasionally, for 4 to 5 minutes. Remove from heat.8) Add rice; mix well.9) Fill peppers with turkey mixture. Top with reserved stem end of peppers Add water to the baking dish. Cover with foil.10) Bake peppers for 12 to 15 minutes, or until tender-crisp.11) Remove stem top of peppers, sprinkle evenly with cheese. Bake for 2 to 3 minutes, or until cheese is melted.12) Replace tops and serve.


